This tutorial will take you through the steps of building a web app supported by the Node.js JavaScript runtime, and deploying it to the web on the Heroku platform. In this tutorial you'll build a simple score sheet that takes new scores and names from user-input and displays them on a web-page, keeping a persistent log of user-additions in a .json file. This will take you through all of the steps of initializing an app, building folder architecture, writing paths for your server, testing and deploying. You can find the example app files here, and see a version running on Heroku here.
This tutorial was written working with videos and code from Dan Shiffman.
Setting up your app in node.js
This tutorial will help you build a simple app that accepts user input, stores it to a local file, and displays that input in the page when it is loaded or new input is saved. This is meant as an example framework that could have many applications: saving scores in a game app, saving image or other user data for returning users, etc.
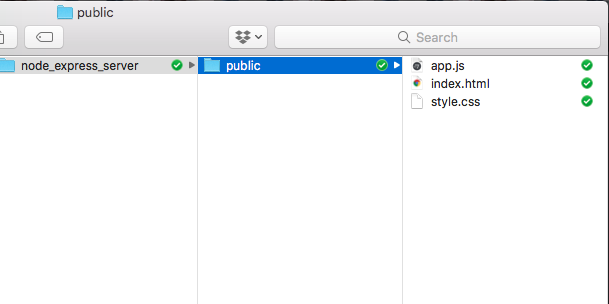
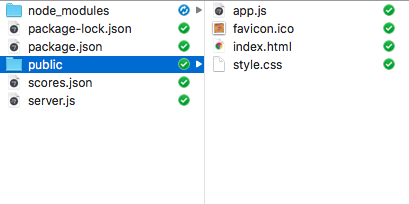
The first step to creating any web project is building your folder architecture. Create a folder to hold this entire project, and inside that folder create a folder called "public". You'll create a server.js file inside this project folder, and the "public" folder will contain the web files served up by your server (the "frontend"): index.html and your .js and .css files. Right now, your folder architecture should look like this:
These files do not yet have to contain any HTML, CSS or JavaScript. You'll write the frontend later.
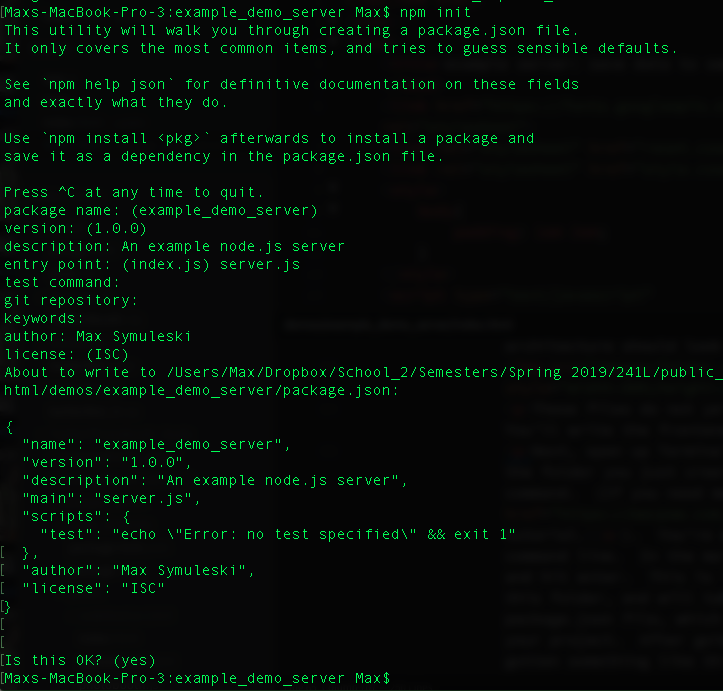
Next, open up Terminal or your Command Prompt (PC) and navigate to the folder you just created using the "cd" or "change directory" command. (If you need more info on Terminal commands see this tutorial.). You're now going to initialize your app with the command line. In the main project folder on terminal type "npm init" and hit enter. This is the command to initialize a node project in this folder, and will take you through the process of creating a package.json file, which is how Node organizes meta-information about your project. This will ask a number of questions related to the project, most of which you can just use the default information. For the entry point enter "server.js" as this will be our main server file. After going through the init commands, you should have gotten something like this in your Terminal:
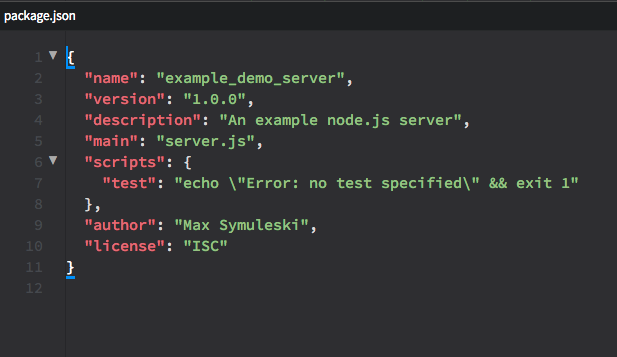
You will also now have a package.json file in that main folder and it will look something like this:
You'll be editing this file later with a start script and a node version, but for now it's fine as is.
Building the App
At this point, you'll want to build out the front end of your application: the index.html and style.css files in the "public" folder. This is the public facing side of your application, or the files that the server will serve. In other words, when someone navigates to the web address where your application sits, this is the index.html that will load, the styles that will be applied, and the javascript that will be run.
The server (server.js which will sit at the project root) itself will also be written in JavaScript, so you should not get these two files confused. If you plan on making a p5.js canvas for your front end, the code for this would sit in the .js file in "public", and this file would be called by your index.html page. This JavaScript file will also contain "get" and "post" calls to your server. Think about this when designing your app. What data do you want to send to the server? What data do you want to receive?
In the example, data is input by the user of the frontend in the input fields, and then that data is sent to the server. Right now, when designing the front end, I will need to add these input fields, and write code in the .js file to grab data from these fields when the user submits it.
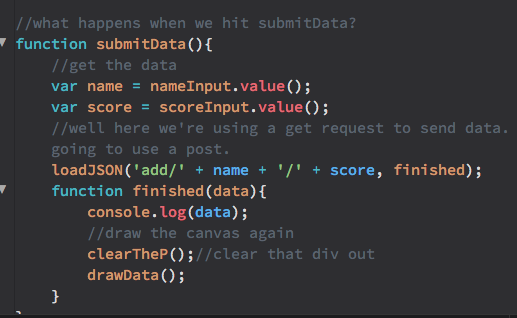
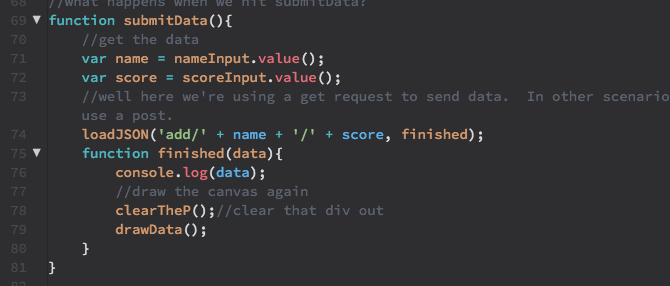
Check out app.js. This file is written in JavaScript using p5.js. in the setup() function I've written code to select the inputs and reference them to a variable and to create a "submit" button.
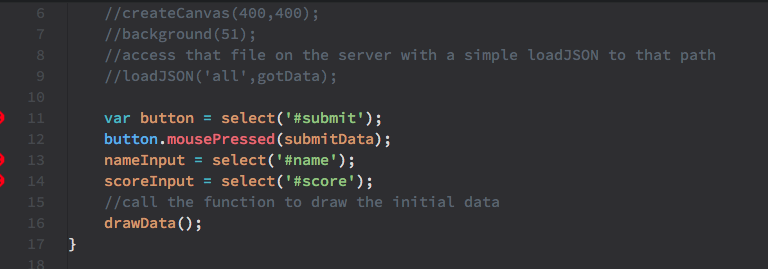
When the submit button is pressed, the submitData() function is called which grabs the values in the input fields, and runs a "GET request" with the p5.js function loadJSON() . Writing what happens when these get requests are called will happen on the server side, but for now just note that the important part happens with the parameters entered into loadJSON() , which structure a url extension with the name and score entered by the website user in the input fields. When this function is finished a callback is called that runs two other functions, clearTheP(), which removes the previous scores div from the page, and drawData(), which pulls all of the data from the server and displays it on the page.
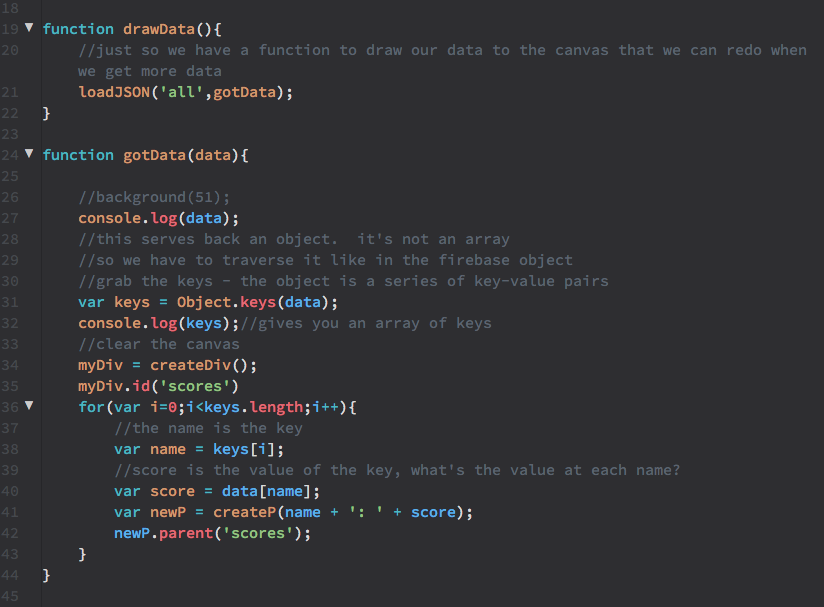
drawData() and its callback function, gotData() do the work of calling the stored scores back from the server and displaying these on the page. Like the function to submit data, drawData() also uses the loadJSON() method in p5. Note that in this function, the path that the function is loading is simply 'all'. gotData() then parses through the data and displays the scores in a div of p elements.
Some things to note at this point:
- This javascript file will interact with the server using entirely "get" requests. These are easy to make because we can add our data to url strings. Since each data call is only to add one name and one score, the data to be sent is tiny and can be sent by adding these variables into a url path (making these url paths is how a get request works). If you need to be able to send a lot of data you'll want to use a POST request, which is slightly different. There is a method for this in p5 called httpPost(), which should help you send larger JS objects formatted as JSON. You can also see an example a post request in my twitterPhotoBooth demo.
- We're using loadJSON() because it is easy, and we're working with JSON formatted data. P5.js also has a method for httpGet(), which could be used in a similar way to loadJSON() here, formatting the URL as a query string as in the example above (eg:"/name/score").
- These methods for getting and posting are native to P5.js, and in vanilla JavaScript things are a bit more complicated. JQuery and JavaScript both support various methods for get and post. There is a good article on these here
At this point, you should also finish the html and css for your demo. Next you'll write the server.
Writing the Routes for Server.js
Writing the server starts with importing the node packages ("modules") you'll need for support. Node makes this a simple command line process. This project will use one external package called express, which will provide methods for writing the GET Routes for the server. Here's the Express Documentation.
Open up a Terminal window and navigate back to your main project folder. Once you're in there (you can always check where you are with the command "pwd"), enter the following into your command line:

The "sudo" prefix stands for "super-do", and will require you to enter your password. You may not need this command depending on the user settings on your computer, but it's safe to use it here. The "npm install express" is the command to install express, and the "--save" suffix tells the installer to write this "dependency" to the package.json file. You package.json file should now be updated to include this dependency, and you will have a new "node modules" folder in your project folder.
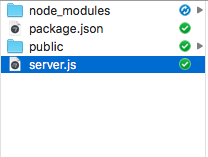
In your main project folder, the folder that CONTAINS the "public" folder, create a file called server.js. This file will contain the code for your server, and so it needs to sit in the project "backend" outside of public. Your folder structure should look something like this:
In the server.js file you're now ready to create the server.
Start with this:
I'll run through each part, line-by-line:
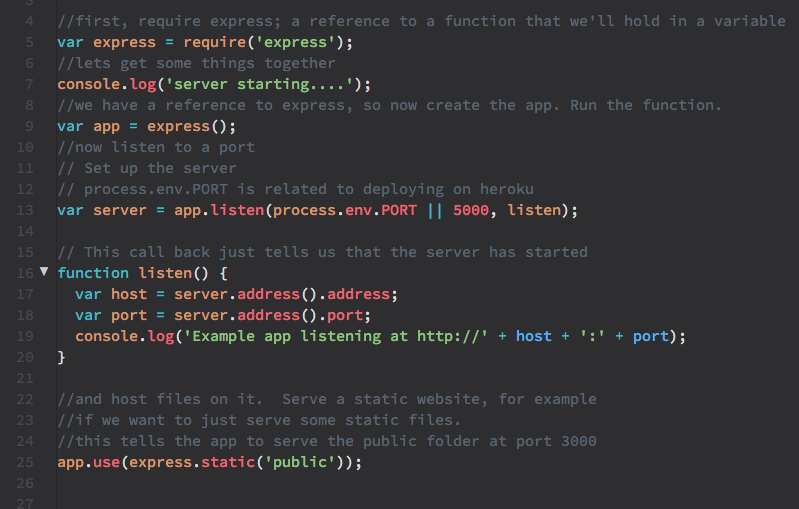
var express = require('express');andvar app = express();load the express package (it's in the node modules folder now, but node knows where to find it), and create an instance of it in the variableapp. From now on, when you want to do things with express methods like .use() or .get(), you'll hook it toapp, as inapp.use().- The command to start the server and listen to a port is on line 13:
var server = app.listen(process.env.PORT || 5000, listen);. The syntax is structured precisely for uploading to Heroku, but this will also work for local development and start your server to serve things at port 5000 orhttp://localhost:5000. The "port" is an endpoint for messages. This is like opening a channel for your server to communicate with the frontend which will be displayed in a browser. function listen()is the callback for the function above. This just logs the server and port so you have easy access to the address. Theconsole.log()logs this to the console (your Terminal application, in this case) so you can easily copy/paste the local web address once the server has started.- The next command on line 25 actually points your app towards the public folder.
app.use(express.static('public'));Tells the server to serve up the contents of the public folder.
Create your first server.js with just these lines, save your server.js file and navigate to the Terminal. Make sure you're in your main project folder, where server.js sits (run the command "ls" to list the contents of your current directory). And run the following command:

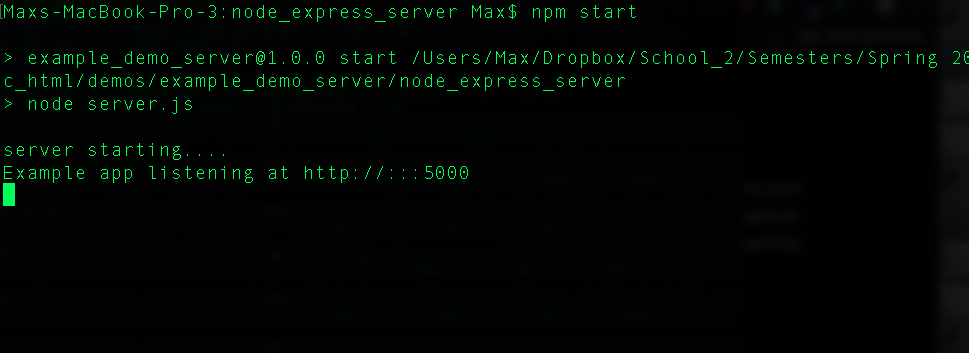
Hit enter - this is the command to start the server. You should see this in the Terminal:

Your server has started!
Navigate to http://localhost:5000 to see the contents of index.html. With this server.js file you've created a pretty decent development server. You don't have any server "paths" yet, or real directed communication between the server and your frontend. But you could now write an app.js file in the public folder that can preload image and sound files, make api calls to load data from the web, and do other things for development that are not possible without a background server running. And you could use this as a development server to create a website, add folders, HTML, CSS and JS files to public, and create links between these files.
At this point, it's time to write some server paths. These will work just like url paths from the frontend, but a little differently than the ones we have been creating to web addresses serving html files or hosting media. In the front end app.js file, the functions to submit and get data construct url "paths" to be executed with loadJSON(). For example, submitData(); constructs a url path that looks like /add/name/score, and pulls data for "name" and "score" from the user input fields. That code creates a url that looks like http://localhost:5000/add/max/30, and executes that path with loadJSON();. On the server side, instead of having that path serve up an .html file, it will trigger a function that will execute any time that path is followed, and it will grab and store that data - in the case of the example path it would save "max" and "30" as a new name and score. You can use paths like GET and POST to do any number of things: send data to the server (as in this example) load data from the server (also in this example), make an API call, trigger another server process, etc. This structure of paths that execute server processes and pass data back and forth is the foundation of back-end development. It can happen in any number of languages (Ruby, PHP, JAVA). Here, you're doing it with JavaScript in the node.js framework.
You'll now have to write the "GET" paths for the server to follow.
The syntax for that looks like this:
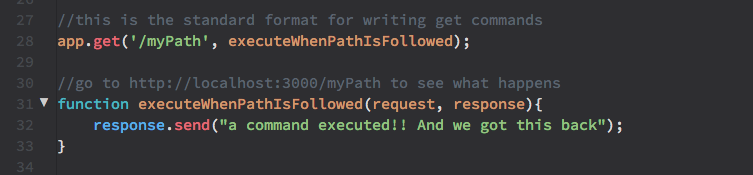
Add these lines to your file, go to the Terminal, make sure you're in the right directory and restart the server in the terminal with:
Hit enter. Open a browser window and navigate to http://localhost:5000/myPath. You should see this in your browser window:
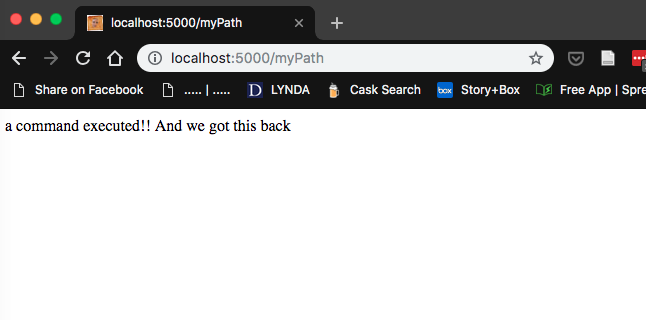
Take a look again at the server code in server.js. app.get(); has two parameters: 1) the path to follow, in this case "/myPath", and 2) the callback function, in this case function executeWhenPathIsFollowed(), which has a purposefully convoluted name to make a point. This is your first server path. As long as this line is in your code, anytime someone navigates to /myPath from your server root, they'll get a short text response displayed in the browser.
Now to set up the first real path that actually grabs some data. In the frontend, you wrote a path that looked like /add/name/score. In the backend, we're going to get the contents of the path as our data. Add the following app.get() and callback function to your server:
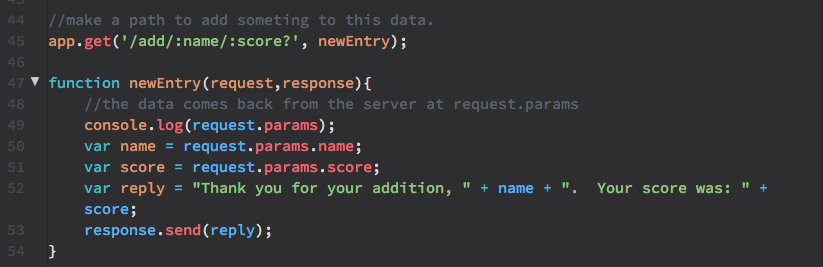
This tells the server where to go when /add/name/score is followed from the frontend. Notice the : in front of both name and score, and the ? following score. This means that the server is expecting these as "parameters" of the request, and the question mark at the end will allow the path to leave score off, and still work.
The newEntry(request,response) function has two parameters, as above, request and response. (any GET or POST path you write will have request and respose parameters) The request will carry the path's "data". The response will send back a response to the browser.
Stop your server, save server.js and restart in the Terminal, then navigate to http://localhost:5000/add/jane/55
In the browser window, you should see the response from the server: "Thank you for your addition, Jane. Your score was: 55"
In practice you'll want to actually have the server store this data and do something with it, not just display it in the browser window. Node.js has several modules for handling getting and storing data in files. One of these is "fs" or FileSync, and this comes native with node.js and does NOT have to be installed with npm install ___.
Add the following line to server.js to "require" the fs module:

At this point, you're going to set up a sort of "dummy" database that will exist in your server and store the score data in the form of a .json file, the file that you'll be "synching" with FileSync.
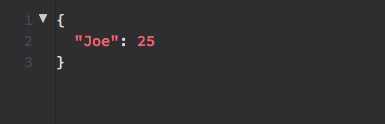
Navigate over to Brackets or whatever your code editor you're using and create a new file called "scores.json". In that file, write your first object of data, just to start the server off with something when it reads this file for the first time:
Save this file, and in server.js, add some lines to load and read this file and store its contents in the variable scores when the server starts.

Now, anytime you start the server, you'll load the scores.json file and store it in the scores variable. You'll be able to both update and save new scores using this variable as the program is running.
Now, re-write the /add/:name/:score? path callback to actually do something with that data when it's received in the path.
In server.js, you're going to update the function newEntry(request,response).
The new version of that function should look like this:
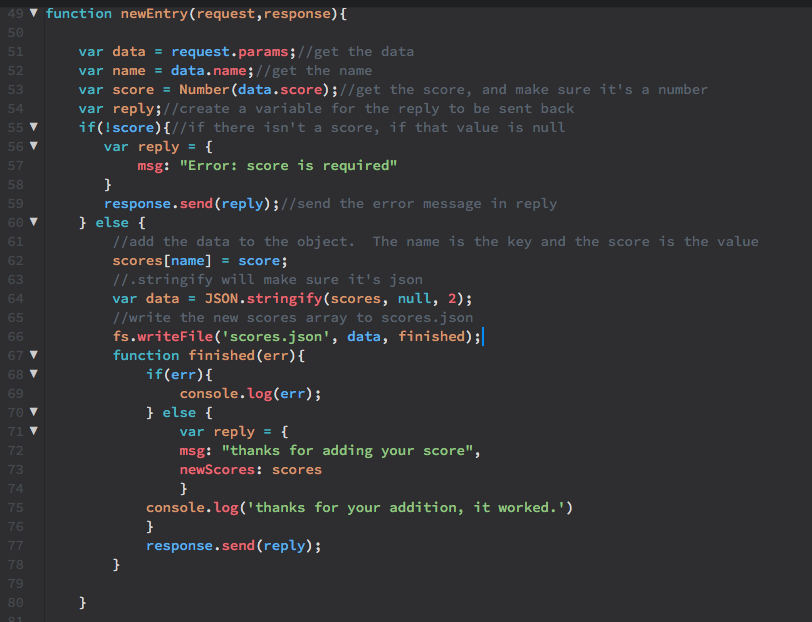
Step by step through this code:
request.paramsis where the necessary data will come through the path. The name and score coming in through/add/:name/:score?are stored in thenameandscorevariables.Number()helps to make sure the score is actually a number (in case you want to do something with this fact later: sort the data, etc.)- A variable is created for the
replythat will be sent back to the client. - Then, some conditional logic handles the data storage. First, if there's no score, don't store the data and send back a reply asking for a score.
- If there's a score, it's added to the
scoresobject withscores[name] = score. This makes each score in the object a key - value pair with the name as the key and the numerical score as the value. You could format this in many ways depending on your use-case before saving to .json. Remember: on the other end, when the data comes back to display client-side, app.js will also have to read this data in whatever way you format it here. var data = JSON.stringify(scores, null, 2)uses the JavaScript methodJSON.stringify(). The parameters here areJSON.stringify(obj, replacer, white space).- Finally
fs.writeFile('scores.json', data, finished)writes the data to the file scores.json, and then calls the callback functionfinished()where the final reply to the client is formatted and sent. - Note that the
scoresJavaScript Object is sent back to the client in the response withvar reply = {msg: "thanks for adding your score", newScores: scores}andresponse.send(reply);
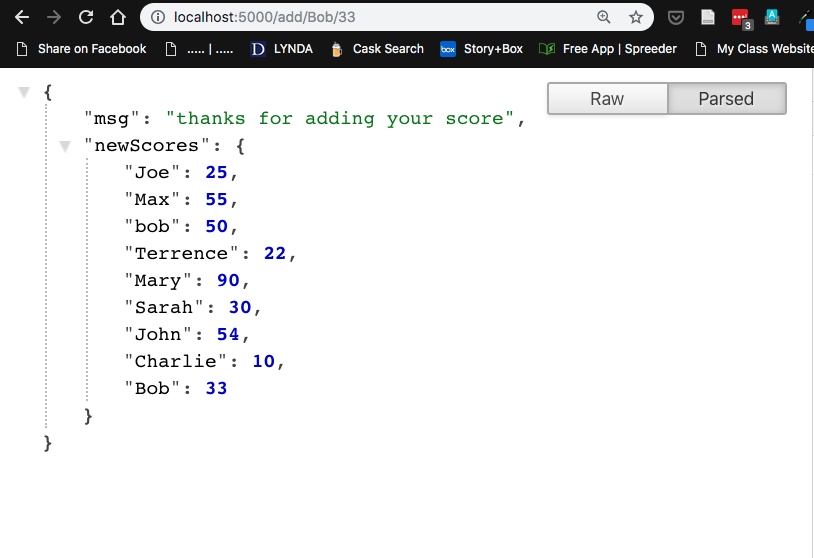
You can now test this out by starting your server again in the terminal, and navigating in the browser to http://localhost:5000/add/Bob/33.
You should get back the reply object with the msg, your new entry, and whatever other entries you've added in completing this tutorial.
The final thing to add to the server is a function that simply returns all of the data when the /all path is followed. Add the following at the end of your server.js
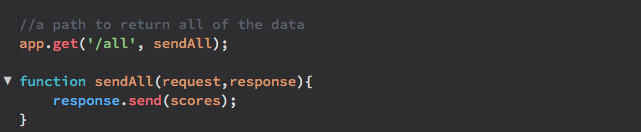
This assigns the path to /all to a function that returns the scores object which should be persistently updated to reflect any new scores. Again, stop your server, start it again, and check the new path by going to http://localhost:5000/all. You should get a response in the browser with the entire scores object.
Even without the frontend, you now have a basic API for your scores data with two paths: one to add new names and scores, and one to show all of the data in the "database" (the .json and javascript object where the scores data are stored).
Testing the Front End
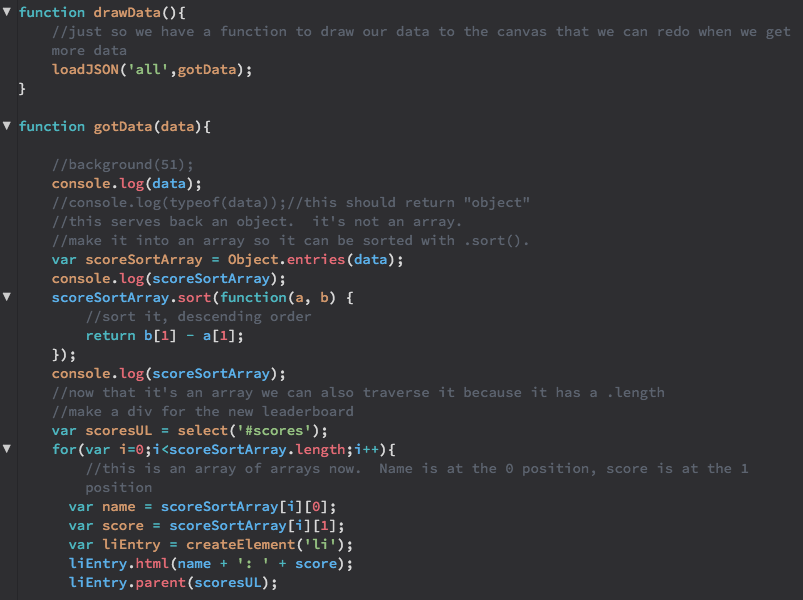
In your text editor, return to the frontend files in the public folder - you'll now finalize this file and make sure that your client webpage work. Open the app.js file. You should now be able to tell more clearly how the submitData(), drawData(), and gotData() functions are working with the server routes you've set up. drawData() follows /all and calls the function gotData(), where the data (a JavaScript object) is parsed into an array with Object.entries(data); and sorted with .sort(function(a,b)) {...}, which returns the array sorted by score from greatest to least, then in the for() loop each entry is added to the document as LI elements in the UL #scores.
submitData() follows the path for /add/:name/:score?, pulls the name and the score from the input fields in index.html, and constructs the url path to be followed with loadJSON(). The data that comes back with console.log(data) in the finished() function logs the msg and new scores object to the console when it comes back from the server. Note, the sketch does not do anything with this message and data, but calls clearTheP() to clear the existing HTML elements from the UL, and drawData() again to call the scores object back to the server (now updated) and render it again once a new score has been submitted.
Test these functions by starting your server once again, and navigating to the index.html file by pointing your browser to http://localhost:5000. You should see the interface and current scores list.
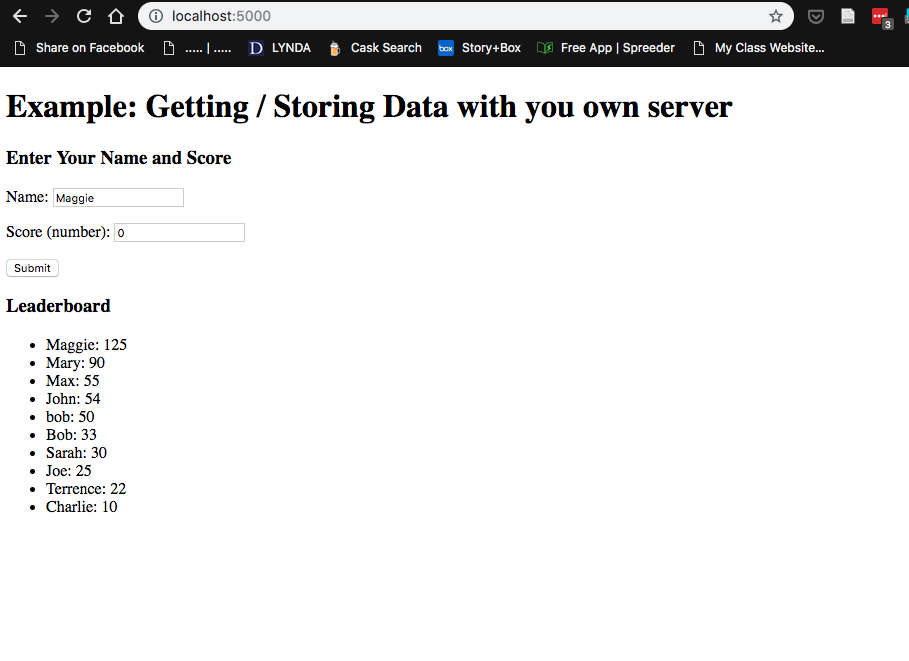
Submit a few scores and check the console to make sure everything is loading correctly. Make any changes or improvements at this point to the front end.
If all is saving and loading correctly, your frontend client and server are now working locally.
Deploying on Heroku
Before you upload your app to Heroku, there are a few pieces of code to check.
First, you'll want to update the package.json file to include some supplemental information for deploying on Heroku. Remember, package.json is like a meta-file that contains information about your app: it's creator, any licenses, it's dependencies. The first thing to add is a start command. Throughout this tutorial you've been starting your server with node server.js in the Terminal. Heroku will need this command written into the package file so it knows what command to run to start the app.
In package.json add the following line to "scripts":

Heroku will now know how to start your server. You can also test this command to make sure it is working locally by navigating to the Terminal and starting your server with:
 That command should start your server and you will see something like this:
Next, you need to add the information about the current version of node you are using to your package.json file. Go back to the Terminal, stop your server and run the command node -v. When you hit enter you should see the version # of node you are using.

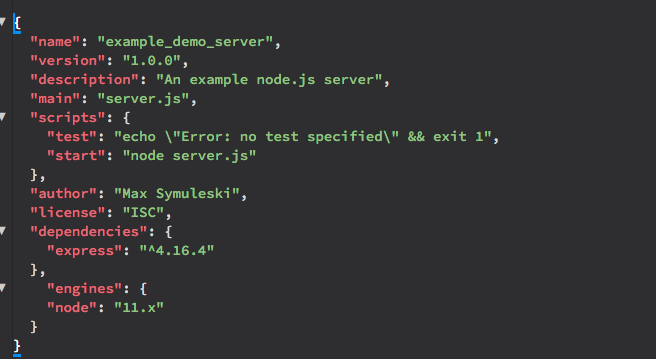
In your text editor open package.json once again and addthis information with a new key called "engines". Your finished package.json file should look like this:
Double check to make sure that your JSON syntax is correct and there are no trailing commas or unclosed brackets in your file. You can always validate a JSON file online with a free validation service like JSON Lint.
Check your work by starting your server once again with npm start.
Now, one final thing to add to your files in order to get this working on Heroku is a Favicon. This is a small 16px by 16px image that appears in the browser tab when your app website is loaded. For some reason that I cannot fathom, I have found that I get consistent errors when I do not include a favicon.ico image file at the root of my client. You can generate a Favicon at the link above, or create your own small 16x16px image save it as favicon.ico. Add this to the root level of your client in the public folder. Your final folder / files should look something like this.
You're now ready to upload to Heroku. But you will need two things before you get started:
- Git version control software installed on your computer
- A Heroku.com account.
First, install Git using the instructions link above. If you have a newer Mac you may already have Git installed. Test this out in the terminal by running the command git --version.
If you have not already done so, you should also go to Heroku.com and create an account. You will also have to set up your communication with Heroku from your Terminal by downloading the Heroku CLI (Command Line Interface). There are great instructions both for installing Git and Setting up the Heroku CLI on the Heroku website's "Getting Started with Node.js" article.
Once you've installed the Heroku CLI and Git on your machine log into Heroku by running heroku login in the Terminal. This should prompt you to "press any key" to login to Heroku and will open a browser window for login.
Now, on the Heroku Website, start the app building process by hitting the link for "New" in the upper right hand corner of the developer homepage, and choosing "Create New App" from the dropdown. This will load a new screen prompting you to enter an app name. Enter a name of your choosing for your project. Your name should be all lowercase letters and include no underscores. The input field will warn you if your name is invalid or taken. Don't worry about pipelines for now, and simply hit, "create app".
This will bring you to a new page with all of the information you need to deploy your app. Scroll on this page until you see the section entitled, "Deploy using Heroku Git". You'll follow the step by step instructions there to get your app started.
You should already be logged in to Heroku on the Terminal. Navigate to your app directory if you're not currently in it using the cd /path/to/my/folder command. Once you're in your main project directory, at the same level as the server.js file, and outside the "public" folder, initialize a "Git" in that directory with the following commands, replacing "example-app-node-scores" with your app name. You should have a version of this you can copy paste from your own App page on heroku:

Deploy your application with the following commands (you should also have a version of these on your app page):

The commands tell the app to git add ., or "add everything to our Git version in this folder", git commit -am "your message here" to initialize a "commit" of this change, and git push heroku master to "push" that change to the master "branch" of your application on Heroku. You should get back a bunch of information from Heroku, and at the end of all this, a web address where your APP is now residing:

Open a browser window and navigate to this address to check if your app is up and running. You should see the familiar index.html from your local testing.
Congratulations! You've built and deployed a Node.js app on Heroku!
Having trouble getting your app started?
The first thing to do for troubleshooting is to check the application logs. Go to your app page on Heroku, in the upper right-hand corner in the dropdown for "More" choose "view logs." This will take you to the console log for your app, where all console information and any errors should be logged. Errors generally appear in orange or red. If you see any errors about a missing "favicon.ico" file, make sure you have a favicon in your public folder.
Errors often come with number codes, like: "413" or "503". Googling and referencing these codes or any other error messages will help you find solutions others have tried when reporting the same issue.
Other Helpful Links:
- Heroku Dev Center: Node.js Support
- Dan Shiffman: Heroku Deployment TwitterBot Tutorial
- Johnny Kalambay's Node.js and Heroku Tutorial (also pretty good)